
The Ultimate Guide to Choosing and Using Acrylic Nail Clippers
- Do you love having acrylic nails but hate most likely going to the beauty salon whenever you require a trim or a touch-up? Do you intend to conserve money and time by cutting your acrylic nails in your home? If you answered yes to these concerns, you should get yourself a set of acrylic nail clippers.
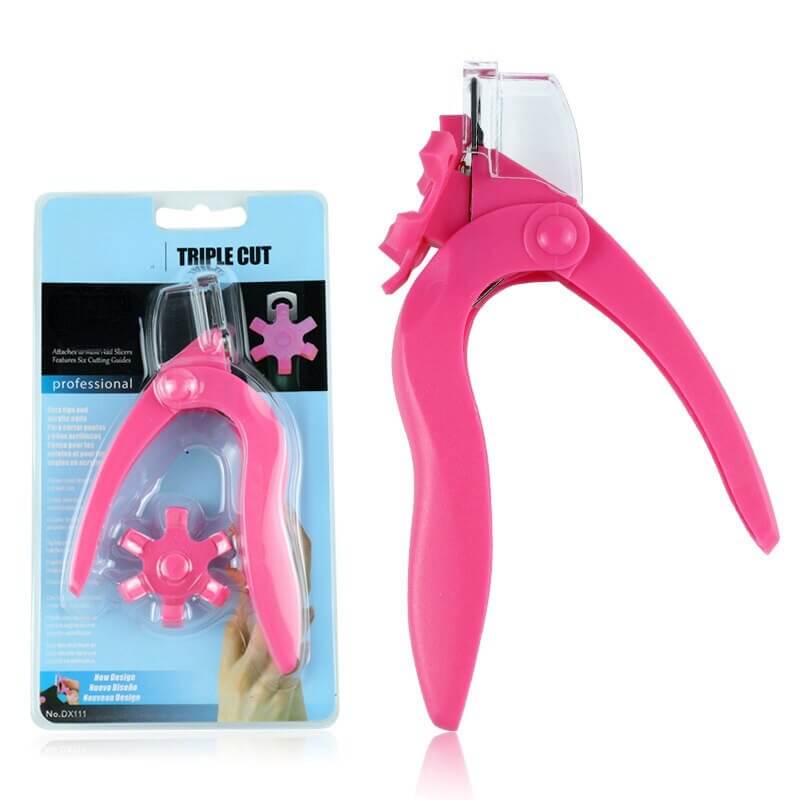
- Acrylic nail clippers are unique devices that cut, cut, and shape acrylic nails. They are different from routine nail clippers or scissors because they have curved blades that fit your fake nails’ shape. They likewise have a spring-loaded deal that gives you much more control and accuracy when cutting your nails.
- In this blog post, I will tell you everything you need around acrylic nail clippers: what they are, how they function, and why you require them. I will likewise reveal to you just how to choose the right acrylic nail clippers for your nail shape and size, cut, trim, and form your acrylic nails, and care for your acrylic nails and clippers. Likewise, I will share some of the most effective acrylic nail clippers in 2023 and some pointers and tricks for utilizing them to create magnificent nail art.
What are Acrylic Nails, and How are They Different from Other Artificial Nails?
- Acrylic nails are a type of artificial nails that are made from a mixture of liquid monomer and powder polymer. The mixture is applied to the natural nails or nail tips and then hardened by air or UV light exposure. Acrylic nails are durable, strong, and long-lasting but can damage natural nails if not applied or removed correctly.
- Acrylic nails are different from other types of artificial nails, such as gel nails, dip powder nails, or press-on nails, in terms of their composition, application, removal, and maintenance. As an example, gel nails are made from a gel-like compound that is cured under UV or LED light, dip powder nails are made from a colored powder dipped right into a liquid activator, as well as press-on nails are pre-made nails glued onto the all-natural nails. Each artificial nail has benefits and downsides, depending on the user’s preference and way of living.
How to Apply and Remove Acrylic Nails Safely and Easily
- To apply acrylic nails, you will need some tools and materials, such as acrylic nail tips, nail glue, acrylic liquid and powder, a nail brush, a dapper dish, a nail file, a buffer, a cuticle pusher, a cuticle oil, and a top coat. You can buy these items from a beauty supply store or online. The steps to apply acrylic nails are as follows:
- Prepare your natural nails by removing any polish, pushing back the cuticles, trimming and filing the nails, and cleaning them with alcohol or acetone.
- Choose the right size of acrylic nail tips for each finger and apply a thin layer of nail glue on the edge of the information. Press the end onto your natural nail and hold it briefly. Repeat for all the fingers.
- Cut the tips to your desired length and shape them with a nail file. Buff the surface of the information to remove any shine and create a rough texture for the acrylic to adhere to.
- Pour some acrylic liquid into the dampened dish and dip your nail brush into it. Wipe off the excess fluid on the edge of the word and then dip the brush into the acrylic powder. A small bead of acrylic should form on the tip of the meeting.
- Place the acrylic bead near the cuticle area of your nail and spread it evenly over the entire nail with gentle strokes. Make sure to cover the seam between the tip and your natural nail. Repeat for all the fingers.
- Wait for the acrylic to dry completely. It should take about 10 to 15 minutes. You can test if it is dry by tapping it with another nail. It should make a clicking sound.
- File and buff your nails to smooth out any bumps or ridges. Apply cuticle oil to moisturize your cuticles, and then apply a top coat to seal and protect your acrylic nails.
- To remove acrylic nails, you will need some tools and materials, such as acetone, cotton balls, aluminum foil, a nail clipper, a nail file, a buffer, a cuticle pusher, cuticle oil, and a moisturizer. You can buy these items from a beauty supply store or online. The steps to remove acrylic nails are as follows:
- Cut your acrylic nails as short as possible with a nail clipper. File the surface of your nails to remove any top coat or polish.
- Soak some cotton balls in acetone and place them on each nail. Wrap each finger with aluminum foil to secure the cotton ball in place. Leave them on for about 20 to 30 minutes.
- Remove the foil and cotton balls from each finger. The acrylic should be soft and easy to peel off. If not, soak them for another 10 minutes.
- Use a cuticle pusher to scrape any remaining acrylic from your nails gently. Be careful not to damage your natural nails.
- Buff your nails to smooth out any rough edges. Apply some cuticle oil to moisturize your cuticles and some moisturizer to hydrate your hands.
The Benefits of Using Acrylic Nail Clippers for Your Fake Nails
- Acrylic nail clippers are unique devices that cut, cut, and form acrylic nails. They are different from regular nail clippers or scissors because they have a rounded blade that fits the form of your phony nails. They likewise have a spring-loaded handle that provides extra control and accuracy when cutting your nails.
- Using acrylic nail clippers for your fake nails has many benefits, such as:
- Saving money and time by cutting your acrylic nails at home instead of going to the salon whenever you need a trim or a touch-up.
- Avoid damaging your natural nails using a sharp and clean tool that can cut through the acrylic without cracking or splitting it.
- Develop your nail layouts and styles by shaping your acrylic nails to your liking. You can also use acrylic nail clippers to create stunning nail art with acrylic nails and acrylic nail clippers.
How to Choose the Right Acrylic Nail Clippers for Your Nail Shape and Size
- Choosing the ideal acrylic nail clippers for your nail sizes and shape ensures a smooth and comfy reducing experience. There are various kinds of acrylic nail clippers readily available in the market, such as:
- Straight edge acrylic nail clippers: These are ideal for square or rectangular-shaped nails, as they can create a clean and straight cut across the tip of the nail.
- Curved edge acrylic nail clippers: These are ideal for oval or almond-shaped nails, as they can create a curved and natural-looking cut along the edge of the nail.
- Pointed edge acrylic nail clippers: These are ideal for stiletto or coffin-shaped nails, as they can create a sharp and pointed cut at the tip of the nail.
To choose the right acrylic nail clippers for your nail shape and size, you should consider the following factors:
- The size of your nails: If you have long nails, you should pick an extra substantial and larger acrylic nail clipper to deal with the density and weight of your nails. If you have brief nails, you must choose a smaller and lighter acrylic nail clipper that can fit your nails far better and avoid over-cutting them.
- The shape of your nails: If you have a specific nail form that you wish to maintain or develop, you ought to select an acrylic nail clipper that matches the problem of your nails. For example, if you have oval-shaped nails, you ought to choose a curved-edge acrylic nail clipper that can follow the curve of your nails.
- The quality of your nails: If you have strong and also healthy, and balanced nails, you can select any acrylic nail clipper that suits your preference and also style. Nonetheless, if you have weak or fragile nails, you should pick a top-quality and durable acrylic nail clipper that can cut through your nails without triggering any damage or breakage.
- Caring for your acrylic nails as well as clippers is essential to keep them in good condition and also stop infections or injuries. Here are some ideas on how to look after your acrylic nails and acrylic nail clippers:
- Maintain your acrylic nails tidy as well as dry. Please wash your hands regularly with soap and water and thoroughly dry them with a towel. Prevent soaking your hands in water for too long, as this can deteriorate the bond between the acrylic and your all-natural nails. Use gloves when doing family jobs or horticulture that involve water or chemicals.
- Maintain your acrylic nails hydrated. Apply oil or cream to your follicles and nails daily to prevent them from drying or breaking. Avoid using rough items which contain alcohol or acetone on your nails, as these can damage the acrylic finish.
How to Use Acrylic Nail Clippers to Cut, Trim, and Shape Your Acrylic Nails
- To use acrylic nail clippers to cut, trim, and shape your acrylic nails, you will need tools and materials, such as acrylic nail clippers, a nail file, a buffer, cuticle oil, and a top coat. You can buy these items from a beauty supply store or online. The steps to use acrylic nail clippers to cut, trim, and shape your acrylic nails are as follows:
- Clean your hands and nails with soap and water. Dry them thoroughly with a towel.
- Choose the correct acrylic nail clippers for your nail shape and size. Hold the clippers in your dominant hand and place the blade near the tip of your nail. Make sure to align the edge with the direction of your nail growth.
- Squeeze the handle of the clippers gently and firmly to cut through your nail. Do not twist or pull the clippers while cutting, as this can cause uneven or jagged edges. Repeat for all the fingers.
- File and buff your nails to smooth any rough edges or corners. Use a fine-grit file to shape your nails according to your preference. Use a buffer to polish your nails and remove any scratches or marks.
- Apply cuticle oil to moisturize your cuticles, and then apply a top coat to seal and protect your acrylic nails.

- Acrylic nail clippers are the best tools for cutting, trimming, and shaping acrylic nails. They are easy to use, affordable, and versatile. But don’t take our word for it. Try them for yourself and see the difference. Click the link below and order your acrylic nail clippers now!
- In conclusion, acrylic nail clippers are the very best tools for cutting, cutting, and also shaping acrylic nails. They are easy to use, inexpensive, as well as versatile. They can assist you preserve money as well as time by engraving your acrylic nails in your house as opposed to going to the beauty salon whenever you require a trim or a touch-up. They can help you avoid damaging natural nails by utilizing a sharp, tidy device that can puncture the acrylic without fracturing or splitting it. And likewise they can assist you create your nail styles as well as designs by forming your acrylic nails to your taste. You can likewise make use of acrylic nail clippers to create sensational nail art acrylic nails and also acrylic nail clippers.
- If you want to learn more about acrylic nail clippers and how they can make your life easier and your nails more beautiful, then don’t hesitate to click the link below and get your pair today. You won’t regret it!
- Thank you for reading this blog post. I hope you found it helpful and informative. If you have any questions or comments, please leave them below. I would love to hear from you. 😊

FAQS
- Q: What are acrylic nails, and how are they different from other types of artificial nails?
- A: Acrylic nails are a type of artificial nails that are made from a mixture of liquid monomer and powder polymer. The mixture is applied to the natural nails or nail tips and then hardened by air or UV light exposure. For example, gel nails are made from a gel-like substance cured under UV or LED light, dip powder nails are made from a colored powder dipped into a liquid activator, and press-on nails are pre-made nails glued onto the natural nails. Each type of artificial nail has its advantages and disadvantages, depending on the preference and lifestyle of the user12
- Q: How to apply and remove acrylic nails safely and efficiently?
- A: To apply acrylic nails, you will need some tools and materials, such as acrylic nail tips, nail glue, acrylic liquid and powder, a nail brush, a dapper dish, a nail file, a buffer, a cuticle pusher, a cuticle oil, and a top coat. You can buy these items from a beauty supply store or online. The steps to apply acrylic nails are as follows:
- Prepare your natural nails by removing any polish, pushing back the cuticles, trimming and filing the nails, and cleaning them with alcohol or acetone.
- Choose the right size of acrylic nail tips for each finger and apply a thin layer of nail glue on the edge of the information. Press the info onto your natural nail and hold it briefly. Repeat for all the fingers.
- Cut the tips to your desired length and shape them with a nail file. Buff the surface of the information to remove any shine and create a rough texture for the acrylic to adhere to.
- Pour some acrylic liquid into the dampened dish and dip your nail brush into it. Wipe off the excess fluid on the edge of the word and then dip the brush into the acrylic powder. A small bead of acrylic should form on the tip of the meeting.
- Place the acrylic bead near the cuticle area of your nail and spread it evenly over the entire nail with gentle strokes. Make sure to cover the seam between the tip and your natural nail. Repeat for all the fingers.
- Wait for the acrylic to dry completely. It should take about 10 to 15 minutes. You can test if it is dry by tapping it with another nail. It should make a clicking sound.
- File and buff your nails to smooth out any bumps or ridges. Apply some cuticle oil to moisturize your cuticles and then apply a top coat to seal and protect your acrylic nails2
- To remove acrylic nails, you will need some tools and materials, such as acetone, cotton balls, aluminum foil, a nail clipper, a nail file, a buffer, a cuticle pusher, cuticle oil, and a moisturizer. You can buy these items from a beauty supply store or online. The steps to remove acrylic nails are as follows:
- Cut your acrylic nails as short as possible with a nail clipper. File the surface of your nails to remove any top coat or polish.
- Soak some cotton balls in acetone and place them on each nail. Wrap each finger with aluminum foil to secure the cotton ball in place. Leave them on for about 20 to 30 minutes.
- Remove the foil and cotton balls from each finger. The acrylic should be soft and easy to peel off. If not, soak them for another 10 minutes.
- Use a cuticle pusher to scrape any remaining acrylic from your nails gently. Be careful not to damage your natural nails.
- Buff your nails to smooth out any rough edges. Apply some cuticle oil to moisturize your cuticles, and then apply some moisturizer to hydrate your hands3
- Q: How to cut acrylic nails with nail clippers?
- A: To cut acrylic nails with nail clippers, you will need tools and materials, such as acrylic nail clippers, a nail file, a buffer, cuticle oil, and a top coat. You can buy these items from a beauty supply store or online. The steps to cut acrylic nails with nail clippers are as follows:
- Clean your hands and nails with soap and water. Dry them thoroughly with a towel.
- Choose the correct acrylic nail clippers for your nail shape and size. Hold the clippers in your dominant hand and place the blade near the tip of your nail. Make sure to align the edge with the direction of your nail growth.
- Squeeze the handle of the clippers gently and firmly to cut through your nail. Do not twist or pull the clippers while cutting, as this can cause uneven or jagged edges. Repeat for all the fingers.
- File and buff your nails to smooth any rough edges or corners. Use a fine-grit file to shape your nails according to your preference. Use a buffer to polish your nails and remove any scratches or marks.
- Apply some cuticle oil to moisturize your cuticles and then apply a top coat to seal and protect your acrylic nails4
QUOTE
- Nail Care Products | FDA - U.S. Food and Drug Administration. This source provides information on how nail products are regulated, how to use them safely, and some common nail product ingredients, such as methacrylic acid, formaldehyde, and toluene. It also explains the differences between cosmetics and drugs and how to report adverse nail product reactions
- The 13 Best Nail Clippers - Byrdie. This source lists some of the best nail clippers for different needs and preferences, such as design, clipping catcher, attached file, and rotating head. It also gives tips on how to care for your nails and clippers and how to avoid common mistakes when cutting your nails
Tags: